Next.js
Next.js is now shipping with an experimental OpenTelemetry integration. This guide will help you instrument your Next.js application(s) with OpenTelemetry and send traces to Checkly.
Before you start
You need:
- A Next.js application using at least Next.js 14.
Step 1. Install the @vercel/otel package
For Next.js, Vercel has created a wrapper that should get you going very quickly. We’re just adding some extra packages so we can filter out the Checkly Traces.
npm install --save \
  @vercel/otel \
  @opentelemetry/api \
  @opentelemetry/sdk-trace-base \
  @opentelemetry/exporter-trace-otlp-http
Make sure to install v1.9.1 or later of the @vercel/otel package as it contains a critical bug fix for Vercel’s Edge runtime.
Step 2. [Only in Next.js 14]: Initialize the instrumentation
Set the instrumentationHook flag to true in your Next.js configuration file. This will enable the OpenTelemetry instrumentation.
/** @type {import('next').NextConfig} */
const nextConfig = {
  experimental: {
    instrumentationHook: true
  }
}

module.exports = nextConfig
Step 3. Set up the instrumentation
Create an instrumentation.ts file in the root of your project, or, place it in the src directory if you are using one.
And add the following code:
import { registerOTel } from '@vercel/otel'
import { SamplingDecision } from '@opentelemetry/sdk-trace-base'
import { trace, Context } from '@opentelemetry/api'

export function register() {
  registerOTel({
    serviceName: 'acme-next-app',
    traceExporter: 'auto',
    spanProcessors: ['auto'],
    traceSampler: {
      shouldSample: (context: Context) => {
        const isChecklySpan = trace.getSpan(context)?.spanContext()?.traceState?.get('checkly')
        if (isChecklySpan) {
          console.log('Sampling decision for Checkly span:', SamplingDecision.RECORD_AND_SAMPLED)
          return {
            decision: SamplingDecision.RECORD_AND_SAMPLED
          }
        } else {
          console.log('Sampling decision for non-Checkly span:', SamplingDecision.NOT_RECORD)
          return {
            decision: SamplingDecision.NOT_RECORD
          }
        }
      },
    },
  })
}
Notice that we are using the default exporter and span processor from the @vercel/otel package, which is configured by using the auto value.
This package is compatible with Vercel’s Edge runtime, in contrast to the @opentelemetry/exporter-trace-otlp-http package, which is not.
If you are not using Vercel or don’t use Vercel’s Edge runtime, you can also use the @opentelemetry/exporter-trace-otlp-http
and just follow the regular Node.js instrumentation guide.
This is however not required, the above configuration should work just fine on Node.js and Edge runtimes.
Also notice the sampler configuration. This is a custom, head-based sampler that will only sample spans that are generated by Checkly by
inspecting the trace state. This way you only pay for the egress traffic generated by Checkly and not for any other traffic.
Step 5 (Local development). Start your app with the instrumentation
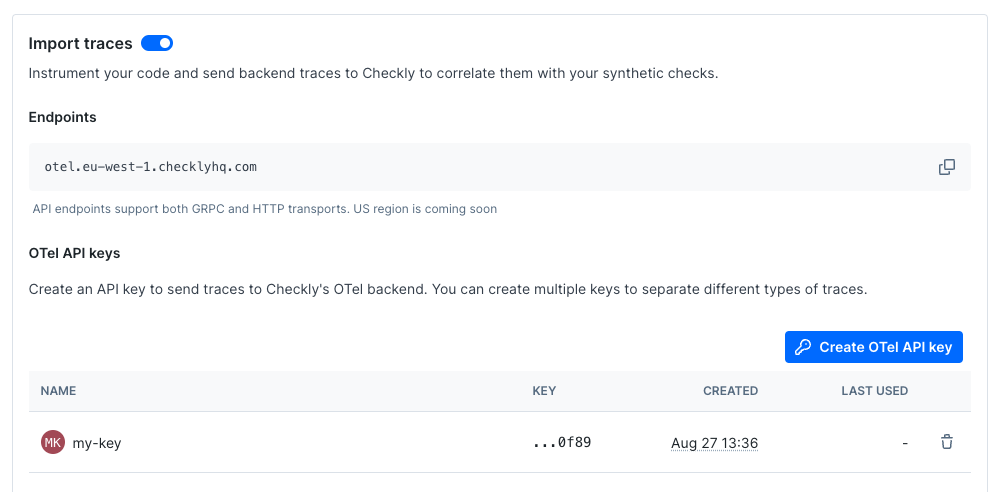
Toggle on Import Traces and grab your OTel API key in the OTel API keys section of the Traces page in the Checkly app and take a note of the endpoint for the region you want to use.

Now, export your API key in your shell by setting the OTEL_EXPORTER_OTLP_HEADERS environment variable.
export OTEL_EXPORTER_OTLP_HEADERS="authorization=<your-api-key>"
Next, export the endpoint for the region you want to use and give your service a name.
export OTEL_EXPORTER_OTLP_ENDPOINT="https://otel.eu-west-1.checklyhq.com"
export OTEL_SERVICE_NAME="your-service-name"
During the beta we only have one region available: eu-west-1. We will expand to US regions soon.
We are using the standard OpenTelemetry environment variables here to configure the OTLP exporter.
| Variable | Description |
|---|---|
OTEL_EXPORTER_OTLP_HEADERS |
The Authorization HTTP header containing your Checkly OTel API key. |
OTEL_EXPORTER_OTLP_ENDPOINT |
The Checkly OTel API endpoint for the region you want to use. |
OTEL_SERVICE_NAME |
The name of your service to identify it among the spans in the web UI. |
Step 6 (Vercel deployment). Set up environment variables.
When using Vercel to host your Next.js app,
5.1. First, add the environment variables to your Vercel project settings:
OTEL_EXPORTER_OTLP_HEADERS, with the OTel API key you get in Traces settings, using theauthorization=ot_.OTEL_EXPORTER_OTLP_ENDPOINT, use: https://otel.eu-west-1.checklyhq.com, withoutv1/traces.OTEL_SERVICE_NAME, your applications’ name.OTEL_LOG_LEVEL, set the log level todebugas to see the span sampling.

5.2. Run a check and confirm it works!
Schedule a check, you should see the Vercel logs reporting Sampling decision for Checkly span: # and soon the spans will show up in your check results page as well.
Further reading
Have a look at the official Next.js docs on how to enable the experimental OpenTelemetry integration.
Last updated on August 20, 2025. You can contribute to this documentation by editing this page on Github